Deprecated: Creation of dynamic property WP_Term::$cat_ID is deprecated in /home3/beautjm9/public_html/wp-includes/category.php on line 378
Deprecated: Creation of dynamic property WP_Term::$category_count is deprecated in /home3/beautjm9/public_html/wp-includes/category.php on line 379
Deprecated: Creation of dynamic property WP_Term::$category_description is deprecated in /home3/beautjm9/public_html/wp-includes/category.php on line 380
Deprecated: Creation of dynamic property WP_Term::$cat_name is deprecated in /home3/beautjm9/public_html/wp-includes/category.php on line 381
Deprecated: Creation of dynamic property WP_Term::$category_nicename is deprecated in /home3/beautjm9/public_html/wp-includes/category.php on line 382
Deprecated: Creation of dynamic property WP_Term::$category_parent is deprecated in /home3/beautjm9/public_html/wp-includes/category.php on line 383
Here is a video tutorial that shows you how to create a paper rose:

Enjoy!
Love in Christ,
Nana
___________________________________________________________________________
Hola Chica Linda! Aqui está el video que les explica cómo hacer la rosa que ven aquí:
Espero que lo disfruten!
Besitos en Cristo,
Nana
Deprecated: Creation of dynamic property WP_Term::$cat_ID is deprecated in /home3/beautjm9/public_html/wp-includes/category.php on line 378
Deprecated: Creation of dynamic property WP_Term::$category_count is deprecated in /home3/beautjm9/public_html/wp-includes/category.php on line 379
Deprecated: Creation of dynamic property WP_Term::$category_description is deprecated in /home3/beautjm9/public_html/wp-includes/category.php on line 380
Deprecated: Creation of dynamic property WP_Term::$cat_name is deprecated in /home3/beautjm9/public_html/wp-includes/category.php on line 381
Deprecated: Creation of dynamic property WP_Term::$category_nicename is deprecated in /home3/beautjm9/public_html/wp-includes/category.php on line 382
Deprecated: Creation of dynamic property WP_Term::$category_parent is deprecated in /home3/beautjm9/public_html/wp-includes/category.php on line 383
Arlene here to show you how to make some pretty flowers quickly and easily with materials you have in hand.You’ll need:
Tissue paper, Brad, Hole punch, Scissors, Deco scissors, Mist/ink.
Ready to get started?
First you take 2 sheets of tissue paper

and start folding.
First fold in half and then fold into fourths.

I then took a circular lid and traced it unto the paper. The size of the lid you want to use depends on the size you want the flower. I cut the circle out.

Remember buying those deco scissors when you first started scrapping? Come on, admit it…you have a few. I have about 13…and I don’t have the heart to get rid of them. Well, I used them to cut the edge of the circle. It left a pretty “frill†to it.
.

Now use the hole punch to make a hole in the center for the brad.

Put the brad through and then gently pinch each layer. If you’re too rough, the tissue paper will tear.

This is how it looks when you’re done.

It looks so pretty like this, but to add more I like to spritz it.

When you spritz it, make sure you’re gentle…and try not to spray too heavily. I try to keep the paper layers separate a bit afterwards.
Now for whole other look: follow all of the steps above, but don’t use the deco scissors. Instead, punch the hole and then cut from the edge to almost the center. Make sure not to over cut or the flower will fall apart.


Now gently fluff and separate the layers.

Again, I inked the flower for that extra oomph.

Here’s the finished product!

These flowers are fast and easy to make! Hope you’ve been inspired to make them!
]]>
Deprecated: Creation of dynamic property WP_Term::$cat_ID is deprecated in /home3/beautjm9/public_html/wp-includes/category.php on line 378
Deprecated: Creation of dynamic property WP_Term::$category_count is deprecated in /home3/beautjm9/public_html/wp-includes/category.php on line 379
Deprecated: Creation of dynamic property WP_Term::$category_description is deprecated in /home3/beautjm9/public_html/wp-includes/category.php on line 380
Deprecated: Creation of dynamic property WP_Term::$cat_name is deprecated in /home3/beautjm9/public_html/wp-includes/category.php on line 381
Deprecated: Creation of dynamic property WP_Term::$category_nicename is deprecated in /home3/beautjm9/public_html/wp-includes/category.php on line 382
Deprecated: Creation of dynamic property WP_Term::$category_parent is deprecated in /home3/beautjm9/public_html/wp-includes/category.php on line 383
Doodling has been around since people started writing and drawing. …so why not use it in scrapbooking?!
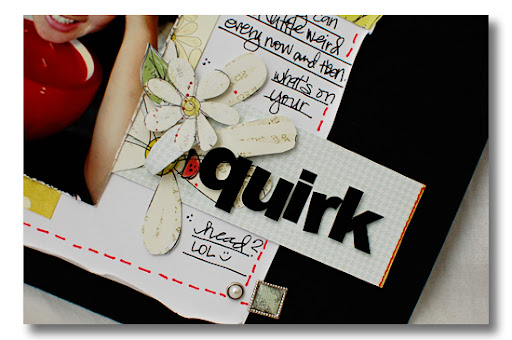
To add a fun stitched look to your layout, try doodling! Simply draw lines around the edges of the paper to get the look of a simple single stitch. Also, try using other colors to achieve different looks. I doodled on a layout using the July kit.
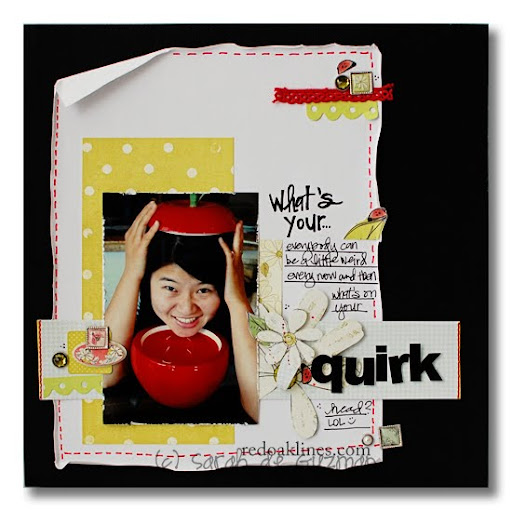
Simple stuff, right?! Give it a try on your next project. 🙂
Hugs,
sarah.
Deprecated: Creation of dynamic property WP_Term::$cat_ID is deprecated in /home3/beautjm9/public_html/wp-includes/category.php on line 378
Deprecated: Creation of dynamic property WP_Term::$category_count is deprecated in /home3/beautjm9/public_html/wp-includes/category.php on line 379
Deprecated: Creation of dynamic property WP_Term::$category_description is deprecated in /home3/beautjm9/public_html/wp-includes/category.php on line 380
Deprecated: Creation of dynamic property WP_Term::$cat_name is deprecated in /home3/beautjm9/public_html/wp-includes/category.php on line 381
Deprecated: Creation of dynamic property WP_Term::$category_nicename is deprecated in /home3/beautjm9/public_html/wp-includes/category.php on line 382
Deprecated: Creation of dynamic property WP_Term::$category_parent is deprecated in /home3/beautjm9/public_html/wp-includes/category.php on line 383
“How do you add extra pop to your projects?”
To be quite honest, I’m all about dimension. To add dimension, use tons of foam adhesive to die cuts, letters, stickers, etc. You name it, I’ve used foam on it. 😉
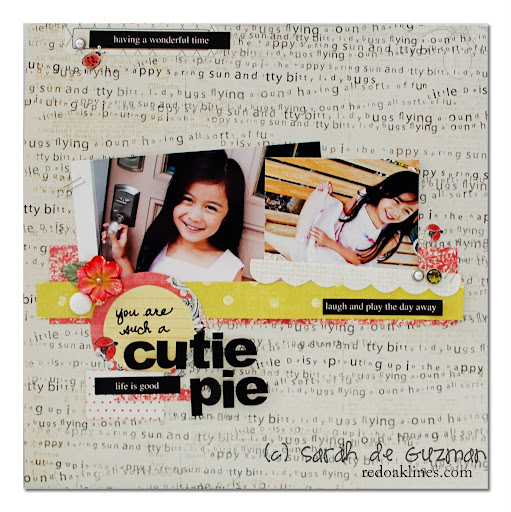
For instance, here are some examples I created using this month’s sold-out kit:

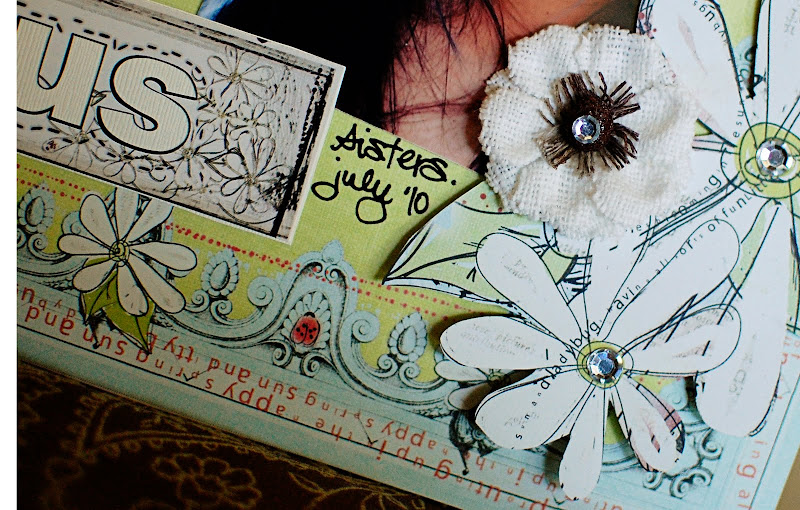
In the above layout, by adding foam adhesive to the back of my cut out flowers, it adds some pizazz to my overall page.
Also, try adding foam to the back of letters. It definitely makes your title pop!
Besides making your projects look neat, using foam adhesive to add dimension also saves you tons of money. It’s a great way to make it look like your own handmade embellishments.
…so next time you feel like there’s something missing on your project, try adding dimension using foam adhesives.
Hugs,
sarah.
Deprecated: Creation of dynamic property WP_Term::$cat_ID is deprecated in /home3/beautjm9/public_html/wp-includes/category.php on line 378
Deprecated: Creation of dynamic property WP_Term::$category_count is deprecated in /home3/beautjm9/public_html/wp-includes/category.php on line 379
Deprecated: Creation of dynamic property WP_Term::$category_description is deprecated in /home3/beautjm9/public_html/wp-includes/category.php on line 380
Deprecated: Creation of dynamic property WP_Term::$cat_name is deprecated in /home3/beautjm9/public_html/wp-includes/category.php on line 381
Deprecated: Creation of dynamic property WP_Term::$category_nicename is deprecated in /home3/beautjm9/public_html/wp-includes/category.php on line 382
Deprecated: Creation of dynamic property WP_Term::$category_parent is deprecated in /home3/beautjm9/public_html/wp-includes/category.php on line 383


4. Use a brush and some distress ink reinker to lightly paint around the flock areas to create depth and a more natural look on the flocking.

This is the layout I created using this technique:
Enjoy!!
Irene Tan
Blog: http://scrapperlicious.blogspot.com/
Deprecated: Creation of dynamic property WP_Term::$cat_ID is deprecated in /home3/beautjm9/public_html/wp-includes/category.php on line 378
Deprecated: Creation of dynamic property WP_Term::$category_count is deprecated in /home3/beautjm9/public_html/wp-includes/category.php on line 379
Deprecated: Creation of dynamic property WP_Term::$category_description is deprecated in /home3/beautjm9/public_html/wp-includes/category.php on line 380
Deprecated: Creation of dynamic property WP_Term::$cat_name is deprecated in /home3/beautjm9/public_html/wp-includes/category.php on line 381
Deprecated: Creation of dynamic property WP_Term::$category_nicename is deprecated in /home3/beautjm9/public_html/wp-includes/category.php on line 382
Deprecated: Creation of dynamic property WP_Term::$category_parent is deprecated in /home3/beautjm9/public_html/wp-includes/category.php on line 383

The butterflies here were hand cut from the Jillibean patterned paper and colored with distress inks. Yeah… distress inks are not just for distressing… you can do so much with it.

Here are a few simple steps to alter your patterned paper. You will need to hand-cut butterflies from your Jillibean patterned paper. You will also need a non-stick craft mat, at least two colors of distress inks, and a foam blending tool.
Once you have hand-cut your butterflies from the patterned paper, take your foam blending tool and dab it on to your distress ink pad. Starting from the craft mat, blend in the color with your foam blending tool going towards the center of the butterfly.
Replace your foam, and dab the foam blending tool again on another color of distress ink. Again, starting from the craft mat, blend in the color but stay only on the edges of the butterfly.
That’s it! A very simple, quick, and fun way to add more color to your pages and create cheap embellishments for your layouts and projects.
Have a great day!
Iris
]]>Deprecated: Creation of dynamic property WP_Term::$cat_ID is deprecated in /home3/beautjm9/public_html/wp-includes/category.php on line 378
Deprecated: Creation of dynamic property WP_Term::$category_count is deprecated in /home3/beautjm9/public_html/wp-includes/category.php on line 379
Deprecated: Creation of dynamic property WP_Term::$category_description is deprecated in /home3/beautjm9/public_html/wp-includes/category.php on line 380
Deprecated: Creation of dynamic property WP_Term::$cat_name is deprecated in /home3/beautjm9/public_html/wp-includes/category.php on line 381
Deprecated: Creation of dynamic property WP_Term::$category_nicename is deprecated in /home3/beautjm9/public_html/wp-includes/category.php on line 382
Deprecated: Creation of dynamic property WP_Term::$category_parent is deprecated in /home3/beautjm9/public_html/wp-includes/category.php on line 383

We all do it… don’t deny it. We all get that little box from a loved one, it holds a small gift inside, and then we all save the box! We do! If you don’t, you aren’t a crafter. 🙂
 These are the pieces of the kit I still had left after creating my pages and a card.
 This is the box I had saved. First thing… tear that plastic off the top!
 After the plastic is off, re-apply some glue and put a new, prettier paper in the window of the box.
 I even covered the inside of the bottom of the little box with some paper as well.
 Take a look at the supplies you have to work with and make a pretty little ribbon or bow and decoration for your box.
Thanks for stopping by today!
Deprecated: Creation of dynamic property WP_Term::$cat_ID is deprecated in /home3/beautjm9/public_html/wp-includes/category.php on line 378
Deprecated: Creation of dynamic property WP_Term::$category_count is deprecated in /home3/beautjm9/public_html/wp-includes/category.php on line 379
Deprecated: Creation of dynamic property WP_Term::$category_description is deprecated in /home3/beautjm9/public_html/wp-includes/category.php on line 380
Deprecated: Creation of dynamic property WP_Term::$cat_name is deprecated in /home3/beautjm9/public_html/wp-includes/category.php on line 381
Deprecated: Creation of dynamic property WP_Term::$category_nicename is deprecated in /home3/beautjm9/public_html/wp-includes/category.php on line 382
Deprecated: Creation of dynamic property WP_Term::$category_parent is deprecated in /home3/beautjm9/public_html/wp-includes/category.php on line 383